Showing posts with label 21 Day Fix. Show all posts

Tuesday, September 1, 2020

Slow Cooker Chiken Enchilada Casserole

CHICKEN ENCHILADA CASSEROLE
I looooove enchiladas! And this sounds yummy! To make it less damaging with the carbs 💛💛💛 I would cut the tortillas in half. Use 5 corn tortillas vs 10, add a little more chicken and maybe some onions, mushrooms and tomatoes for extra veggies 😉

Here's the recipe as is though!

PREP TIME
10 mins
COOK TIME
9 hours
TOTAL TIME
9 hours 10 mins

Serves: Serves about 7

INGREDIENTS
1.5 lbs. boneless skinless raw chicken breasts
1 28 ounce can Red Enchilada Sauce (I use El Pato Brand)
Add these ingredients at the end
10 corn tortillas
3 cups grated cheddar cheese (divided)
1 3.8 ounce can black olives (divided)

INSTRUCTIONS
Put the chicken breasts and the enchilada sauce in your slow cooker.
Cook on HIGH for 4 hours or LOW for 8 hours.
Shred the chicken with 2 forks right in the slow cooker.
Cut the tortillas into strips, add to chicken and sauce.
Stir.
Add 1 cup of cheese and half the olives into the sauce and chicken mixture.
Stir again.
Flatten the mixture slightly.
Add the rest of the cheese and the olives on top.
Cook on low for about 40 - 60 minutes longer.
Top with sour cream/ Greek yogurt (optional)

Recipe via The Magical Slowcooker 

Tuesday, August 18, 2020

A Healthy, Flourless Hummus Based Cookie!


Healthy cookies? Yup they are! And they're hummus based! The other good thing is that you can call the batter hummus and eat it all before baking lol! They’re also  totally flourless and made with chickpeas soooooo you’re basically eating beans AKA they’re basically health food like I said above haha. 

Recipe type: Snack/Dessert
Prep time:  10 mins Cook time:  12 mins Total time:  22 mins
Serves: 16 cookies

Peanut Butter Banana Chickpea Cookies 

Ingredients
1-15oz can chickpeas, vey well rinsed and drained
½ cup creamy peanut butter
1 small, very overripe banana
2 tsp vanilla extract
⅓ cup coconut sugar*
2 tbsp ground flaxseed
1 tsp baking powder
¼ tsp salt
¼ tsp cinnamon
⅓ cup chocolate chips

Instructions
Preheat oven to 350F. Spray baking sheet with cooking spray (or line with parchment paper or Silipat) and set aside.

Make sure to rinse the chickpeas well so they don't taste beany. 

Shake off the excess water before dumping them into a large food processor. 

Add in the rest of the ingredients (except chocolate chips). 

Process for a full two minutes, or until batter is very smooth. You may need to scrape down the sides. Stir in chocolate chips.

With wet hands, spoon batter onto cookie sheet. It will be very wet and sticky (like hummus). You can use your wet hands to pat them down into smooth cookies. You should have about 16.

Bake for 10-12 minutes.

Store cooled cookies in the refrigerator.

*Recipe via Alexis at Hummusapien


Saturday, August 1, 2020

Crock Pot Steel Cut Oatmeal with Apples and Cinnamon

Beachbody-Blog-Steel-Cut-Oats-Apples-Cinnamon
Who said the slow cooker is just for dinner!? You can make a delish breakfast in it too  Put the ingredients for this oatmeal recipe in a slow cooker when you go to sleep, and it’ll be ready when you wake up in the morning!
Total Time: 7 hrs. 10 min.
Prep Time: 10 min.
Cooking Time: 7 hrs.
Yield: 10 servings, about 1 cup each
Ingredients:
Nonstick cooking spray
1½ cups water
1½ cups unsweetened almond milk
3 cups steel-cut oats
2 medium apples, chopped
¼ tsp. sea salt (or Himalayan salt)
1 tsp. ground cinnamon
2 Tbsp. pure maple syrup
2 Tbsp. ground flax seed
Preparation:
1. Lightly coat inside of slow cooker with spray.
2. Add water, almond milk, oats, apples, salt, cinnamon, maple syrup, and flax seed; mix well. Cook for 5 to 7 hours on low (or 2 to 3 hours on high), or until edges are brown but not burned.
Tips: Times can vary. In order to make sure oatmeal doesn’t burn, test it out the first time during the day to see how long it takes the oatmeal to cook in your slow cooker. Leftover oatmeal can be stored in the refrigerator for up to 4 days, or frozen in individual portions.
Beachbody Blog Calories Apples Cinnamon Steel Cut Oatmeal

Wednesday, July 1, 2020

Eggplant Pizza Bites


These eggplant pizza bites are a great way to get the kids some extra veggies in the form of something we all know and love – PIZZA!
What You Need:
Ingredients for the sauce:
2-3 tsp EVOO
1/2 lb extra lean ground turkey
3 large finely choppe garlic cloves,
16 oz can diced tomatoes
1/2 tsp. dried Italian seasoning blend
1/4 tsp. dried oregano
Directions:
1. Cut the eggplant in slices about 3/4 inch thick.
2. Lay the eggplant slices on paper towels and salt generously to draw out the water. This removes excess water. This is crucial to the recipe.
3. While the eggplant sits, make the sauce.  Start by cooking a generous amount of garlic in olive oil.
4. Then add fresh diced tomatoes, Italian seasoning, and oregano.
5.  Let sauce simmer, adding a tablespoon or two of water whenever it seems dry.
6. While sauce is simmering, brown 1/2 lb of extra lean ground turkey.
7. Once browned, drain any excess liquid and add half of the turkey to the sauce.
8.  After 30 minutes, blot eggplant dry with paper towels & wipe off excess salt.
9.  Brush the eggplant with oil, sprinkle with dried herbs, and roast at 375F/190C for about 25 minutes.
10.  Then divide the sauce mixture among the eggplant pieces, top with the cheese then top with ground turkey.
11. Put pizzas under the broiler just until the cheese is melted and serve warm. These are easy to store, reheat and even freeze so what isn't finished doesn't go to waste!

Saturday, May 9, 2020

Can Drinking Water Really Help You Lose Weight?


💦💦 WATER 💦💦

We ALL need it! But how much AND does it really help you lose weight, lean out, etc? Well here ya go! I watched an excellent video the other day with tons of tips and studies explaining how and why it DOES! Here's a bit of it! I'll be hosting a ⚡️⚡️ FREE⚡️⚡️ Water group in a few weeks to help motivate you to CHUG 💧! If you'd like more info, send me a message through this site, in Facebook, Instagram or via email at ellieperico@aol.com! Now....for the details!

Can drinking water help you lose weight/cut fat?

Here are some studies that have been done that prove YES!

1. Drinking half a liter or 17 oz of water increased metabolism from 24-30% for 1.5 hrs!

2. Drinking water before a meal decreases appetite = you eat less!

3. Half a liter before meals lead to 44% more weightloss than people who didn't drink before meals!

4. All metabolic processes that take place in your body work more efficiently with adequate water intake. Think of it in car terms, as the oil for your engine.

How much water should I drink per day? 

The general rule is half your body weight in ounces. So, if you're 150 lbs you need AT LEAST 75oz. More if you're exercising and/or sweating for any other reason, hence losing extra water. 

What if I'm bloated? Do I drink less? 

If you're bloated, that's an indication that you're bloated. DRINK water. It seems ironic but that's your body's signal to give it H20! It retains any water you have anticipating it may not get any for some time. Similar to when you don't eat.

People think if you don't eat you'll lose weight. Not necessarily. Your body's metabolism will slow down and it will create fat stores. 

Should I drink tap, filtered or bottled water?

Ideally, the best option is getting a good quality filter and drinking filtered water from a BPA free bottle. Stainless steel is a great option. It's been estimated that 205 million Americans are drinking contaminated water, including tap AND bottled water filled with pollutants, fluoride, heavy metals and even prescription drugs! 

Bottled water is no better either! I've been drinking bottled water for years and after reading this, I'll be finishing all of the water bottles I have at home and permanently switching to only BPA free bottles like my kids use
.
They did a study that women who had higher BPA levels in their body weighed 40 lbs more than women who didn't. The BPAs are coming from bottled water, plastic containers for food, etc.

Water in general will help with weightloss not only to make you eat less but to make the body function better as a whole. Your digestive system will work better, you'll have more energy, skin will improve and you'll have less headaches. 

So remember, water is a CRITICAL part of your weightloss and/or fitness routine. Drinking water alone won't shrink your belly BUT drinking water and combining that with a proper diet and fitness routine will lead to success, NO doubt! 

Remember, if you'd like to join me 💧💧 WATER ACCOUNTABILITY GROUP 💧💧 contact me! I may be adding a bonus free meal plan with recipes and snack ideas along with daily nutrition and fitness tips just like I do in my client paid groups! JUST in time for summer 🌞👙💦


Wednesday, April 8, 2020

How to Preserve Spinach in Your Fridge for Weeks!

Not sure about you guys but I'm not a big fan of grocery shopping! So I do whatever it takes to avoid doing it more than 2x a month! And I have 2 kids and a busy life so that isn't easy! But tips like this make it possible! 

Spinach wilts easily and gets soggy within a few days in the fridge! Do this and you can keep it in there for 2-3 weeks!! 

Make sure you use thick paper towels &a you do this either right when you get back from the store or the next day at the latest!

Watch the video by clicking HERE 👇🏼


Wednesday, February 26, 2020

Low Carb Cheesy Bread


Love cheese but hate carbs?


TOTAL TIME: 
PREP: 
LEVEL: EASY
SERVES: 4

INGREDIENTS

  • 3 medium zucchini, or about 4 cups grated zucchini
  • 2 large eggs
  • 2 cloves garlic, minced
  • 1/2 tsp. dried oregano
  • 3 c. shredded mozzarella, divided
  • 1/2 c. freshly grated Parmesan
  • 1/4 c. cornstarch
  • kosher salt
  • Freshly ground black pepper
  • pinch of crushed red pepper flakes
  • 2 tsp. Freshly Chopped Parsley
  • Marinara, for dipping

DIRECTIONS

  1. Preheat oven to 425º and line a baking sheet with parchment. On a box grater or in a food processor, grate zucchini. Using cheesecloth or a dish towel, wring excess moisture out of zucchini.
  2. Transfer zucchini to a large bowl with eggs, garlic, oregano, 1 cup mozzarella, Parmesan, and cornstarch and season with salt and pepper. Stir until completely combined.
  3. Transfer “dough” to prepared baking sheet and pat into a crust. Bake until golden and dried out, 25 minutes.
  4. Sprinkle with remaining 2 cups mozzarella, crushed red pepper flakes, and parsley and bake until cheese is melted, 8 to 10 minutes more.
  5. Slice and serve with marinara.
Recipe via Realhousemoms.com

Thursday, December 19, 2019

Crock Pot Mexican Cauliflower Rice


I've recently fallen completely in love with cauliflower and everything you can do with it.  Cauliflower rice is my latest fave cauli dish and the fact that I can make it in the slow cooker AND make it with a Mexican kick is beyond exciting! Give this recipe a shot and let me know what you think! 

What you need:

  • One large head of cauliflower, stems removed, cut into small to medium chunks of florets. 
  • 1 cup of tomato sauce (or 2 large fresh tomatoes, chopped).
  • 1/2 cup of chicken stock (or water).
  • 1 heaping tbsp of tomato paste.
  • 1 medium white onion, diced.
  • 2 bell peppers (preferably red and yellow), diced.
  • 2 jalapeno peppers, seeded and diced large.
  • 1 tbsp of garlic powder.
  • 2 tsp of chipotle powder/flakes (can substitute cayenne).
  • 2 tsp of ground cumin.
  • 1 tsp of dried oregano.
  • 1 tsp of black or white pepper.
  • Salt to taste.

How you make it:

  1. Add your chicken stock (or water), tomato sauce (or tomatoes), and tomato paste to your slow cooker, stir. 
  2. Add your spices to your slow cooker, stir.
  3. Add your onion and peppers to your slow cooker, stir.
  4. Add your cauliflower florets to your slow cooker, stir everything to coat florets with as much liquid as possible.
  5. This recipe is designed for a 6-quart slow cooker. Cook on low for 5 hours tops. Cook on high for 3 hours tops.
  6. If using  a 4-quart cooker, use 2/3 of the ingredient amounts and the same cooking times.
  7. After cooking, use a spatula or other blunt-ended object to slightly “mash” the florets so that they break up into a rice-like consistency.
  8. Stir well and drain any excess liquid that you do not desire. The cauliflower will absorb more liquid if you store it in the fridge overnight, yet this is a good thing.
  9. Enjoy!
Via Paleo Pot

Friday, December 6, 2019

Lemon Garlic Shrimp + Zoodles

    Delicious, low carb, clean & keto friendly! 

  • INGREDIENTS 
  • 4 cloves garlic (minced)
  • 2 Tablespoons olive oil
  • 2 whole medium/large zucchinis (spiralized)
  • 1 small/medium lemon (juiced with seeds removed)
  • 1/4 teaspoon Kosher salt (more to taste if desired)
  • 1 teaspoon dried oregano
  • 1 teaspoon dried basil
  • 1/2 teaspoon red pepper flakes
  • 2 Tablespoons grated Parmesan (if desired)
  • 20 Cooked, peeled tail off shrimp (amount optional, I prefer a LOT of shrimp!)

ZOODLES DIRECTIONS
You can either buy zoodles premise or purchase a spiralizer & make them yourself with zucchini squash. Heat olive oil in a large sauté pan and add garlic, stirring and heating for 1-2 minutes until lightly golden. Add zoodles and lemon juice and cook over medium heat until noodles are softened, about 3-5 minutes. Gently sprinkle in salt, oregano, basil and red pepper flakes then toss to combine. Garnish with Parmesan cheese if desired.

SHRIMP DIRECTIONS
I like to take shortcuts when I can so I get the Costco cooked, peeled tail off shrimp. I defrost them overnight the night before in the fridge or just run them through water (although the bag directions discourage this... but if I forget to defrost prior to, oh well). Then I cook them in a skillet for just a few minutes for flavor and to heat them up while making the zoom does as well. I use a little olive oil (1tsp), oregano, basil & garlic as I do with the zoodles. 

When both are done, top the zoodles with the shrimp & ENJOY 

Link for the spiralizer I use
Includes 7 different blades + 4 recipes books 

Wednesday, October 16, 2019

10 Minute Meals: Grilled Chicken Breast Sandwich & Veggies

Ok so when I started 10 Minute Meals, I knew that most would be homemade BUT some would be SEMI-homemade because, let's get real, life gets busy! This is one of those "semi-homemade" meals that I make as a quickie lunch when the kids are STARVING or when they get home from school and want a quick snack!


The sandwich is ready made. I just buy it and heat it up from Costco! THEN I add cheese and heat it up a little longer and add pickles (at the kids' request) too!


While this is happening, I steam the Normandy veggies.  I then add them to the plate and sometimes I also melt some cheese on top of it for them.  Super easy, healthy, clean and MUCH better than a McDonald's drive thru!


Below is the nutritional information for the sandwich.  At 280 calories (including the yummy bun) and 15 grams of protein, it's a great choice for kids, who tend to lack protein in their diets because many are carbivores! They LOVE bread, crackers and pasta but aren't big fans of meat, fish or poultry.


Tuesday, October 1, 2019

Chocolate Overnight Oatmeal


Overnight Oatmeal 
2/3 greek yogurt
1 scoop chocolate shakeology
1/4 oats 
4 oz almond milk
2 (honey) 


Place all ingredients in a jar, mix and leave overnight!! Wake up to a protein packed breakfast that's healthy, filling & tastes like dessert in a cup!!


21 Day Fix:  1 reds 1 yellow 1 blue

Monday, September 9, 2019

Pumpkin Pie with Whole Wheat Crust!

Pumpkin-Pie-Whole-Wheat-CrustPumpkin Pie with whole wheat crust! Because you can still enjoy Thanksgiving and fall foods without compromising your nutrition or your goals!
Total Time: 1 hr. 25 min.
Prep Time: 15 min.
Cooking Time: 1 hr. 10 min.
Yield: 9 servings
Ingredients for Pie Crust:
1 cup quick-cooking old-fashioned oats
1 cup whole wheat flour
¼ cup ground raw almonds
1 Tbsp. maple syrup (or raw honey)
¼ tsp. sea salt
3 Tbsp. coconut oil
1 Tbsp. water
Ingredients for Pumpkin Pie:
1 (15 oz) can pumpkin puree
2 large eggs, lightly beaten
1 tsp. pure vanilla extract
¼ cup maple syrup (or raw honey)
½ tsp. ground cinnamon
¼ tsp. ground nutmeg
¼ tsp. sea salt
⅔ cup evaporated nonfat milk
For Pie Crust:
1. Preheat oven to 425° F.
2. Combine oats, flour, almonds, maple syrup, and salt in a medium mixing bowl; mix well.
3. Add oil to oat mixture; mix well. If needed, add water to hold mixture together.
4. Press into a 9-inch pie pan. Bake for 8 to 10 minutes, or until light brown.
For Pie:
1. Reduce oven temperature to 350° F.
2. Combine pumpkin, eggs, vanilla, and maple syrup in a medium bowl; mix well.
3. Add cinnamon, nutmeg, salt, and milk; mix until just blended.
4. Pour pumpkin mixture into prepared pie crust. Bake for 45 to 60 minutes or until a knife inserted in the center comes out clean.

Monday, August 19, 2019

Quinoa Burrito Bowl


Perfect simple snack, lunch or dinner! 
Quinoa
Black beans
Ground beef, turkey or chicken
Salsa
Grilled onions
Grilled peppers
👌


21 Day Fix  = 1 red 1 yellow 1 green

Monday, June 3, 2019

Portion Fix Lunch: Simple Spaghetti Squash Pasta — and Dessert!

It’s hard to believe that a few simple ingredients can combine to make a meal that will leave you feeling full for hours. (Did I mention that it includes chocolate?)

What’s in our Ultimate Portion Fix containers:

Measurement for each container is below

1 Green: spaghetti squash
½ Green: roasted broccoli
½ Purple: marinara sauce
½ Purple: apple
1 Red: ground turkey
1 Yellow: chocolate-covered almonds
1 Blue: Parmesan cheese
1 tsp.: olive oil (not pictured)
Roasted spaghetti squash stands in for pasta topped with jarred, all-natural marinara sauce and cooked ground turkey.

Roast broccoli with a teaspoon of olive oil for about 15 minutes and finished it with shavings of Parmesan cheese (you could sprinkle some of the cheese over the pasta, too).

Start or End the meal with apple slices and chocolate covered almonds!

Red = 3/4 cup
Yellow = 1/2 cup
Green = 1 cup
Blue = 1/3 cup
Purple = 1 cup

Thursday, May 2, 2019

Crock Pot Kale, Feta and Veggie Frittata


Love this recipe because I can make it ahead and have breakfast, lunch or dinner ready to go in the fridge. I seriously eat this for any meal of the day, throughout the day! And it's so versatile. If I have other veggies, such as normandy veggies, in the fridge, I toss those in there as well. And if I have some ground turkey, I may add that too (cooked prior to adding). The possibilities are ENDLESS!

Equipment:
I used my Ninja Cooker, which made it easy to saute the kale right in the slow cooker, but if you don't have a Ninja you can use a 5 or 6 quart oval slow cooker.

Ingredients:
1 - 2 tsp olive oil to saute the kale (only 1 teaspoon for the Ninja, but 2 teaspoons to saute on the stove.)
5 oz. baby kale
non-stick spray or oil (to spray the slow cooker if you don't use the Ninja)
6 oz. roasted red pepper (from a jar), diced fairly small
1/4 cup sliced green onion
4-5 oz. crumbled Feta
8 eggs, well beaten
1/2 tsp. Kirkland organic no salt (or other all-purpose seasoning blend)
fresh-ground black pepper to taste
Greek yogurt for topping (optional, but good)

Instructions:
Wash kale if needed, and spin dry or dry with paper towels. Heat the oil, either in the Ninja Cooker on the Stovetop/High setting or in a large frying pan on medium-high. When the oil is hot, add the kale and saute until it's softened into a flat layer, about 3-4 minutes in the Ninja Cooker and slightly less in a pan. If you're using a regular slow cooker, spray it well with non-stick spray or oil and transfer the cooked kale to the slow cooker. If you're using the Ninja Cooker, turn to Slow Cook/Low setting.
Drain red peppers and chop into fairly small pieces. Slice the green onions and crumble the Feta. Add the chopped red pepper and sliced green onion to the slow cooker with the kale. Beat the eggs well, pour over other ingredients in the slow cooker, and stir so all ingredients are well-combined. Season with Spike Seasoning and black pepper, then sprinkle on the Feta.

Cook on low for 2 - 3 hours, or until the frittata is well set and cheese is melted. (I cooked mine for 2 hours and 45 minutes and it was perfect, but I got distracted with a phone call and it may have been done slightly sooner than that. I think the Ninja cooks a little hotter than other slow cookers, so it may take slightly longer if you don't use the Ninja Cooker.) Serve hot, with a dollop of low-fat sour cream if desired.

This will keep well in the fridge for several days and can be reheated in the microwave. (Don't microwave too long or it will get rubbery.) 
(Makes 6 servings; recipe created by Kalyn with inspiration from several cookbooks and food blogs where she saw egg dishes cooked in the slow cooker.)
21 Day Fix Breakdown: 1 green (kale & peppers), 1 gray (olive oil), 1 red (eggs), 1 blue (cheese)

Sunday, March 31, 2019

Sweet Potato Crust Spinach, Feta & Egg Frittata 


Ingredients
2 medium sweet potatoes
1 teaspoon canola oil
1 (5-ounce) bag baby spinach
1/2 cup 1% low-fat milk
1/2 teaspoon kosher salt
1/4 teaspoon freshly ground black pepper
1/4 teaspoon crushed red pepper
4 large eggs
2 large egg whites
1.5 ounces feta cheese, crumbled

Preparation:
1. Preheat the oven to 350°, then peel and slice sweet potatoes. I sliced mine using a mandoline, but a knife works great as well. The mandoline speeds up the process significantly and gives you even slices. Coat a pie dish with cooking spray, then fill the bottom of the dish with a layer of sweet potato slices. Cut the sweet potato rounds in half and fill around the edges of the pie dish; round side facing up. Once the entire dish is filled, coat one more time with cooking spray. Bake for 20 minutes. Turn heat up to 375°.

2. For the filling, heat a nonstick skillet over medium heat. Add spinach; sauté 3 minutes. Remove from heat; cool.

3. Combine milk and next 5 ingredients in a bowl; stir with a whisk. Arrange spinach mixture in crust; pour egg mixture over spinach. Sprinkle with feta. Bake at 375° for 35 minutes. Let stand 5 minutes; cut into 4 wedges.

Each serving( 4 total) contains the following:
CALORIES 196 FAT 8.5g (sat 3.5g, mono 3.2g, poly 1.2g) PROTEIN: 12g CARB 18g FIBER 4gCHOL 197mg IRON 2mg SODIUM 562mg CALC 155mg
Via Cooking Light 

Wednesday, March 13, 2019

Healthy Version of Alfredo Sauce 


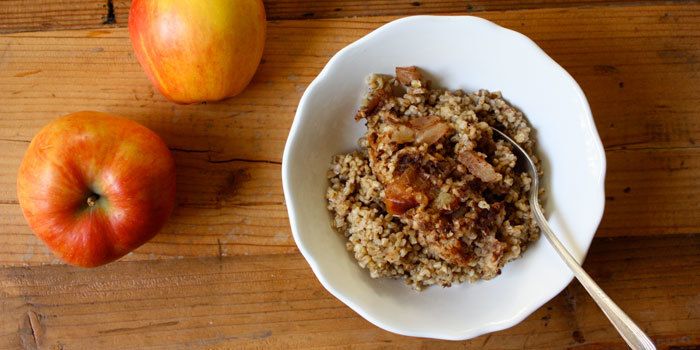
Who says Alfredo sauce can’t be healthy? It absolutely can! And if you replace the pasta noodles with spaghetti squash it’s even better

Try the alfredo sauce recipe below & let me know howyou like it!

Makes enough for about 4 people. Takes about 5 minutes to prep and 10 minutes to cook so it’s easy to make anytime!

Ingredients
1 tablespoon extra virgin olive oil
2 tablespoons cornstarch
1 cup broth vegetable or chicken
1/2 cup skim milk
1/2 cup non fat plain greek yogurt room temperature
1/2 teaspoon salt
1-2 teaspoons garlic powder
1/4 teaspoon black pepper
1/2 cup freshly grated parmesan

Instructions
(1) Heat olive oil in a large sauce pan over medium heat.
(2) Sprinkle with cornstarch and cook for one minute, stirring constantly.
(3) While whisking, slowly add in broth and milk.
(4) Continue whisking to combine until smooth.
(5) Raise heat to medium high and bring the mixture to a simmer.
(6) Once simmering, simmer for about 2 minutes, until it starts to thickened, again, whisking constantly.
(7) Remove from heat and little by little, whisk in greek yogurt.
(8) Once combined, place back on the heat (medium) and stir in Parmesan cheese, salt, pepper, and garlic powder.
(9) Bring to a simmer and simmer for an additional 2 minutes, whisking constantly.
(10) Serve over pasta OR baked spaghetti squash (directions for spaghetti squash below) immediately. If you let it cool, it will thicken up a bit
If not using immediately, store in airtight container in the fridge.

Notes
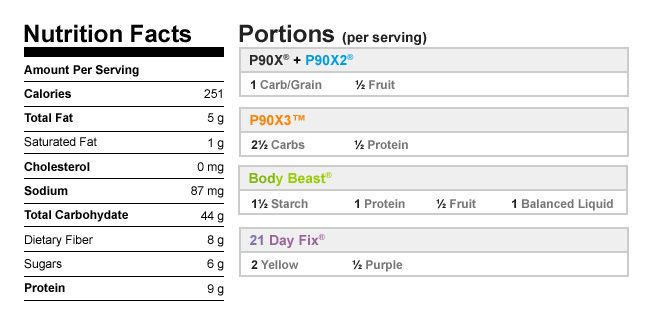
Nutritional information is for 1/4th of the entire sauce recipe.
*This makes enough sauce for about 1/2 - 1 pound of pasta/ spaghetti squash depending on how saucy you like your pasta!

Baked Spaghetti Squash

(1) Preheat oven to 400. Bake spaghetti squash for about 10-15 min to make it easier to cut.
(2) Split/Cut the spaghetti squash lengthwise and remove the seeds
(3) Drizzle the center of each half of split and seeded spaghetti squash with 1/2 tsp olive oil or use olive oil spray. Using your fingers, rub oil evenly into squash. Season with your favorite no salt seasoning.
(4) Place spaghetti squash in a large baking dish center down, and bake for 1 hour. Spray the baking dish or pan so it doesn’t stick
(5) About 30 minutes into baking, begin your sauce (directions above)
(6) When spaghetti squash is finished (center should be tender and come apart when scraped lightly with a fork), use a fork to scrape out the insides. They will come out looking just like spaghetti.
When the sauce is done, either transfer the squash "noodles" to your sauce and toss to coat the squash thoroughly or pour it over the squash.
When ready, serve and top with fresh parsley for garnish.
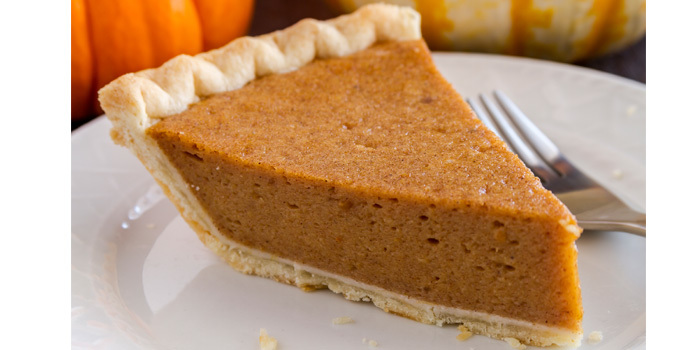
Wednesday, February 20, 2019

Squash Lasagna!


Spaghetti Squash Lasagna

Because we ALL love lasagna but not the ton of carbs that come with it. So here’s a clean and healthy solution. The carbs and sugars will vary depending on the marinara you choose but an estimate is below

 Prep Time 15 mins
 Cook Time 1 hr 17 mins
 Total Time 1 hr 32 mins
 Servings 4 Servings
 Calories 474

Ingredients
1 small spaghetti squash (approx. 3½ to 4 lbs.)
Nonstick cooking spray
4 cups all-natural marinara sauce
3 cups part-skim ricotta cheese
1 cup grated Parmesan cheese
¼ cup finely chopped fresh basil (optional)


Instructions
1. Preheat oven to 375° F.
2. Line large baking sheet with parchment paper. Set aside.
3. Cut spaghetti squash in half lengthwise. Remove seeds and membrane.
4. Place spaghetti squash, cut side down, on baking sheet. Bake for 40 to 45 minutes, or until tender.
5. Reduce oven temperature to 350º F.
6. Scrape spaghetti squash flesh into stringy noodles.
7. Lightly coat 4-quart baking dish with spray.
8. Evenly layer half spaghetti squash, half marinara sauce, and half ricotta cheese in baking dish. 9. Repeat with second layer.
10. Evenly top with Parmesan cheese.
11. Bake for 30 to 32 minutes, or until golden brown and bubbly.
12. Garnish with basil if desired.

Nutrition Info
Portion Fix Containers
1 Green
2 Purple
1 Red
1 Blue

Via Team Beachbody

Thursday, October 11, 2018

Zucchini Grilled Cheese

These are amazing! Zucchini Grilled Cheeeeeeese! Delicioussssss! And low carb!


SERVES: 3-4

INGREDIEditENTS

2 c. grated zucchini
1 large egg
1/2 c. freshly grated Parmesan
2 green onions, thinly sliced
1/4 c. cornstarch
kosher salt
Freshly ground black pepper
Vegetable oil, for cooking
2 c. shredded Cheddar

DIRECTIONS
Squeeze excess moisture out of zucchini with a clean kitchen towel. In a medium bowl, combine zucchini with egg, Parmesan, green onions and cornstarch. Season with salt and pepper.

In large skillet, pour enough vegetable oil to layer the bottom of the pan.

Scoop about 1/4 cup of the zucchini mixture onto one side of the pan and shape into a small square.

Repeat to form another patty on the other side.

Cook until lightly golden on both sides, about 4 minutes per side.

Remove from heat to drain on paper towels and repeat with remaining zucchini mixture.

Wipe skillet clean.

Place two zucchini patties in the same skillet over medium heat.

Top both with shredded cheese, then place two more zucchini patties on top to form two sandwiches.

Cook until the cheese has melted, about 2 minutes per side.

Repeat with remaining ingredients. Serve immediately.

Wednesday, September 5, 2018

Poached Eggs! On Toast & So Much More!


Poached eggs seem to be the topic of conversation in my groups lately! One of the motivating women in it keeps sharing her yummy pics of poached egg breakfasts & it has us all drooling over them

If you haven't tried it, you may want to. I haven't yet, if you can believe that, but I'm shopping & meal prepping again soon & this is on my list

Here's a How To Poach an Egg with a modified recipe via TheKitchn.com

INGREDIENTS
Water
1 large egg
1 tablespoon rice vinegar or other mild-tasting vinegar

EQUIPMENT
Small saucepan
Small measuring cup
Timer
Slotted spoon
Paper towel

INSTRUCTIONS
Fill the saucepan about 2/3 full w/ water & bring to a boil

Turn heat down & let the water relax into a brisk simmer. You should see bubbles coming up to the surface, but it won't be rolling. (It's easier and quicker to control the simmer if you bring it to a boil first, then reduce the heat rather than trying to get it to the perfect simmer from the get-go.)

Crack the egg into a small measuring cup, preferably one w/ a long handle. This will help you ease the egg into the water

Add vinegar to the water: This step is optional, but many people like to add it to the boiling water because it helps the loose, billowy white cohere to itself & cook into a more compact shape. Taste isn't noticeable, although you might notice a firmer, more "squeaky" texture to the white

Use the measuring cup to carefully lower the egg into the water, then tip it out into the water. Make sure the water is at a bare simmer

The final cooking time for a poached egg is very much up to you. It depends on how well you like your eggs done and how hot the water is. But 4 minutes, give or take, in lightly simmering water, will give you a firm white & a gooey but still runny yolk

Use a slotted spoon to remove the egg from the water

Pat the egg dry: This is optional

Place the egg on toast, salad, lean protein & enjoy. Season as desired


If you want to poach multiple eggs at once, make sure your pan is big enough to accommodate all your eggs without crowding them or poach in batches if necessary. Crack each egg into its own measuring cup before you start & slip them into the water one after the next. Add 30 seconds for each extra egg